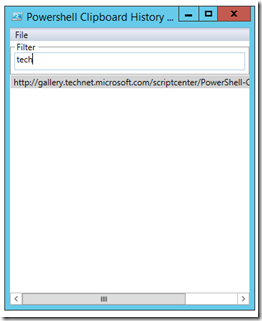
I saw a question a while back in the Technet PowerShell Forum asking how one might start to build a clipboard viewer using PowerShell that met a few requirements:
- Have an open window aside from the PowerShell console
- Automatically list new clipboard items as they come in
- Allow for filtering to find specific items
Not a lot of requirements here, but they are definitely some nice ones to have for this type of request.
I couldn’t really resist this type of challenge and found it to be a lot of fun. I already had a template of sorts from a previous UI that I created here.
[xml]$xaml = @"
<Window
    xmlns="http://schemas.microsoft.com/winfx/2006/xaml/presentation"
    xmlns:x="http://schemas.microsoft.com/winfx/2006/xaml"
    x:Name="Window" Title="Powershell Clipboard History Viewer" WindowStartupLocation = "CenterScreen"
    Width = "350" Height = "425" ShowInTaskbar = "True" Background = "White">
    <Grid >
        <Grid.RowDefinitions>
            <RowDefinition Height="Auto" />
            <RowDefinition Height="Auto" />
            <RowDefinition Height="Auto"/>
            <RowDefinition Height="*"/>
        </Grid.RowDefinitions>
        <Grid.Resources>
            <Style x:Key="AlternatingRowStyle" TargetType="{x:Type Control}" >
                <Setter Property="Background" Value="LightGray"/>
                <Setter Property="Foreground" Value="Black"/>
                <Style.Triggers>
                    <Trigger Property="ItemsControl.AlternationIndex" Value="1">
                        <Setter Property="Background" Value="White"/>
                        <Setter Property="Foreground" Value="Black"/>
                    </Trigger>
                </Style.Triggers>
            </Style>
        </Grid.Resources>
        <Menu Width = 'Auto' HorizontalAlignment = 'Stretch' Grid.Row = '0'>
        <Menu.Background>
            <LinearGradientBrush StartPoint='0,0' EndPoint='0,1'>
                <LinearGradientBrush.GradientStops>
                <GradientStop Color='#C4CBD8' Offset='0' />
                <GradientStop Color='#E6EAF5' Offset='0.2' />
                <GradientStop Color='#CFD7E2' Offset='0.9' />
                <GradientStop Color='#C4CBD8' Offset='1' />
                </LinearGradientBrush.GradientStops>
            </LinearGradientBrush>
        </Menu.Background>
            <MenuItem x:Name = 'FileMenu' Header = '_File'>
                <MenuItem x:Name = 'Clear_Menu' Header = '_Clear' />
            </MenuItem>
        </Menu>
        <GroupBox Header = "Filter"  Grid.Row = '2' Background = "White">
            <TextBox x:Name="InputBox" Height = "25" Grid.Row="2" />
        </GroupBox>
        <ScrollViewer VerticalScrollBarVisibility="Auto" HorizontalScrollBarVisibility="Auto"
        Grid.Row="3" Height = "Auto">
            <ListBox x:Name="listbox" AlternationCount="2" ItemContainerStyle="{StaticResource AlternatingRowStyle}"
            SelectionMode='Extended'>
            <ListBox.Template>
                <ControlTemplate TargetType="ListBox">
                    <Border BorderBrush="{TemplateBinding BorderBrush}" BorderThickness="{TemplateBinding BorderBrush}">
                        <ItemsPresenter/>
                    </Border>
                </ControlTemplate>
            </ListBox.Template>
            <ListBox.ContextMenu>
                <ContextMenu x:Name = 'ClipboardMenu'>
                    <MenuItem x:Name = 'Copy_Menu' Header = 'Copy'/>
                    <MenuItem x:Name = 'Remove_Menu' Header = 'Remove'/>
                </ContextMenu>
            </ListBox.ContextMenu>
            </ListBox>
        </ScrollViewer >
    </Grid>
</Window>
"@
Now to connect to some controls so I can use them and their events later on.
$reader=(New-Object System.Xml.XmlNodeReader $xaml)
$Window=[Windows.Markup.XamlReader]::Load( $reader )

#Connect to Controls
$listbox = $Window.FindName('listbox')
$InputBox = $Window.FindName('InputBox')
$Copy_Menu = $Window.FindName('Copy_Menu')
$Remove_Menu = $Window.FindName('Remove_Menu')
$Clear_Menu = $Window.FindName('Clear_Menu')
Ok, with the front end UI out of the way and I have connected to my controls, I can now work to add some code to handle some events and perform various actions based on those events.
But before that, I am going to wrap this UI up within a runspace so I can leave my PowerShell console open for other things.
$Runspacehash = [hashtable]::Synchronized(@{})
$Runspacehash.Host = $Host
$Runspacehash.runspace = [RunspaceFactory]::CreateRunspace()
$Runspacehash.runspace.ApartmentState = "STA"
$Runspacehash.runspace.Open()
$Runspacehash.runspace.SessionStateProxy.SetVariable("Runspacehash",$Runspacehash)
$Runspacehash.PowerShell = {Add-Type -AssemblyName PresentationCore,PresentationFramework,WindowsBase}.GetPowerShell()
$Runspacehash.PowerShell.Runspace = $Runspacehash.runspace
$Runspacehash.Handle = $Runspacehash.PowerShell.AddScript({
# All my code for this UI
}).BeginInvoke()
The trick to the clipboard viewer is a little type call [Windows.Clipboard] which is only available if you do the following (note this is already available if using the ISE):
Add-Type -AssemblyName PresentationCore
Now you can check out all of the cool static methods which are available.
[windows.clipboard] |
Get-Member -Static -Type Method
I am only focused on Text related methods this time around (GetText() and SetText()) as well as Clear(). But with this I can view and manipulate the contents of the clipboard. I am going to create some custom functions that will utilize this as well as work with some of the UI as well to make things a little easier.
Function Get-ClipBoard {
    [Windows.Clipboard]::GetText()
}
Function Set-ClipBoard {
    $Script:CopiedText = @"
$($listbox.SelectedItems | Out-String)
"@
    [Windows.Clipboard]::SetText($Script:CopiedText)
}
Function Clear-Viewer {
    [void]$Script:ObservableCollection.Clear()
    [Windows.Clipboard]::Clear()
}
With these three functions, I can re-use them when it comes to multiple events that I have planned rather than re-writing the same code for more than one event.
The only thing left to do here is to start working with the events on the various controls that will handle all of the operations of this window.
The first event that I have is one of the most important as it is a Timer which checks the clipboard contents and adds them to the observable collection which in turn updates the listbox on the UI.
$Window.Add_SourceInitialized({
    #Create observable collection
    $Script:ObservableCollection = New-Object System.Collections.ObjectModel.ObservableCollection[string]
    $Listbox.ItemsSource = $Script:ObservableCollection

    #Create Timer object
    $Script:timer = new-object System.Windows.Threading.DispatcherTimer
    $timer.Interval = [TimeSpan]"0:0:.1"

    #Add event per tick
    $timer.Add_Tick({
        $text =  Get-Clipboard
        If (($Script:Previous -ne $Text -AND $Script:CopiedText -ne $Text) -AND $text.length -gt 0) {
            #Add to collection
            [void]$Script:ObservableCollection.Add($text)
            $Script:Previous = $text
        }
    })
    $timer.Start()
    If (-NOT $timer.IsEnabled) {
        $Window.Close()
    }
})
The timer is set to 100 milliseconds which should be plenty of time to handle items being added to the clipboard. The observable collection is binded to the listbox ItemsSource property (actually the view is binded, not the actual collection which is useful when we set up a filter later on in this article) which can auto update the UI as things are added to the collection. See this article on more examples of this.
Speaking of a filter, one of the requirements was being able to type in some text in a text box and have the contents start filtering automatically. This is accomplished using the TextChanged event on the textbox and using a Predicate for the DefaultCollectionView Filter property of the ListBox.
$InputBox.Add_TextChanged({
    [System.Windows.Data.CollectionViewSource]::GetDefaultView($Listbox.ItemsSource).Filter = [Predicate[Object]]{
        Try {
            $args[0] -match [regex]::Escape($InputBox.Text)
        } Catch {
            $True
        }
    }
})
As the text is changing in the textbox, the filter will look for anything that matches it. Pretty handy approach to real time filtering of data.
I also wanted to add some keystroke shortcuts as well to give it a more polished feel.
$Window.Add_KeyDown({
    $key = $_.Key
    If ([System.Windows.Input.Keyboard]::IsKeyDown("RightCtrl") -OR [System.Windows.Input.Keyboard]::IsKeyDown("LeftCtrl")) {
        Switch ($Key) {
        "C" {
            Set-ClipBoard
        }
        "R" {
            @($listbox.SelectedItems) | ForEach {
                [void]$Script:ObservableCollection.Remove($_)
            }
        }
        "E" {
            $This.Close()
        }
        Default {$Null}
        }
    }
})
For this, I currently have the following shortcuts available:
- Ctrl+E
- Exits the application
- Ctrl+R
- Removes the selected items from the clipboard viewer
- Ctrl+C
- Copies the selected items from the clipboard viewer
The rest of the events handle things such as closing the application gracefully, handling the menu clicks on the context menu of the listbox and on the title menu as well as giving focus to the filter textbox at startup.
$Clear_Menu.Add_Click({
    Clear-Viewer
})
$Remove_Menu.Add_Click({
    @($listbox.SelectedItems) | ForEach {
        [void]$Script:ObservableCollection.Remove($_)
    }
})
$Copy_Menu.Add_Click({
    Set-ClipBoard
})
$Window.Add_Activated({
    $InputBox.Focus()
})
$Window.Add_Closed({
    $Script:timer.Stop()
    $Script:ObservableCollection.Clear()
    $Runspacehash.PowerShell.Dispose()
})
$listbox.Add_MouseRightButtonUp({
    If ($Script:ObservableCollection.Count -gt 0) {
        $Remove_Menu.IsEnabled = $True
        $Copy_Menu.IsEnabled = $True
    } Else {
        $Remove_Menu.IsEnabled = $False
        $Copy_Menu.IsEnabled = $False
    }
})
After running the script…
.\ClipboardHistoryViewer.ps1
… we may see an item already being shown (it depends on if something is already in the clipboard) and can then start copying various amounts of text and see the viewer start filling up and also select multiple items and then right-click to copy or remove them (or using the keyboard shortcuts).
I can filter for just the script download location.
I can also use the File>Clear menu to clear out all of the contents of the viewer as well as the clipboard.
Currently these are all of the features that I have for this version, but if others would like to see new things, I can certainly see about updating it.
Download the PowerShell Clipboard History Viewer
http://gallery.technet.microsoft.com/scriptcenter/PowerShell-Clipboard-c414ec78


I believe I answered my own question – the code below does just what I need (almost). If I could perform a “File | Open” and select the file, that would be great.
<#
.SYNOPSIS
UI that will display the history of clipboard items
#>
#Requires -Version 3.0
$Runspacehash = [hashtable]::Synchronized(@{})
$Runspacehash.Host = $Host
$Runspacehash.runspace = [RunspaceFactory]::CreateRunspace()
$Runspacehash.runspace.ApartmentState = “STA”
$Runspacehash.runspace.Open()
$Runspacehash.runspace.SessionStateProxy.SetVariable(“Runspacehash”,$Runspacehash)
$Runspacehash.PowerShell = {Add-Type -AssemblyName PresentationCore,PresentationFramework,WindowsBase}.GetPowerShell()
$Runspacehash.PowerShell.Runspace = $Runspacehash.runspace
$Runspacehash.Handle = $Runspacehash.PowerShell.AddScript({
Function Get-ClipBoard {
[Windows.Clipboard]::GetText()
}
Function Set-ClipBoard {
$Script:CopiedText = @”
$($listbox.SelectedItems | Out-String)
“@
[Windows.Clipboard]::SetText($Script:CopiedText)
}
Function Clear-Viewer {
[void]$Script:ObservableCollection.Clear()
[Windows.Clipboard]::Clear()
}
#Build the GUI
[xml]$xaml = @”
<Grid.RowDefinitions>
</Grid.RowDefinitions>
<Grid.Resources>
<Style.Triggers>
</Style.Triggers>
</Grid.Resources>
<Menu.Background>
<LinearGradientBrush.GradientStops>
</LinearGradientBrush.GradientStops>
</Menu.Background>
<ListBox.Template>
</ListBox.Template>
<ListBox.ContextMenu>
</ListBox.ContextMenu>
“@
}).BeginInvoke()
$names = Get-Content “.\Computers.txt”
foreach ($name in $names) {
$resolvednsResult=resolve-dnsname $name | fl | out-string;
#$outputBox.text=$resolvednsResult
$resolvednsResult | clip
}
Fantastic script!
I have a need to combine this with another script. Currently, yours is loaded, then the one I’m using, so as to capture the output in a way that appends, as you have done.
What I need to accomplish –
There are DNS changes that need to be made quite frequently, and to assist in verifying that the record / records they wish to create do not already exist, the Resolve-DNSName addition to Powershell 5 has been very helpful. However, I have three challenges, and you appear to have unknowingly solved one, if I can get it to integrate.
1. Pipe output to a file or clipboard and be able to append
2. Recursive searching so that I can search for records in a.com, b.a.com, c.b.a.com, aa.com, b.aa.com, etc.
3. Input from a file, so I can run a “for-each” with multiple records. (Some requests can be over 100 DNS changes.)
Here is the code I’m using thus far (and just recently added clip to it. Please forgive the crudeness and non-labels. You put the IP or DNS name in the left-hand box, click the button, and it outputs into the text box as well as your clipboard app.
I would appreciate any help you can give me on this. I want to combine it into one PS app so that who know nothing about PS can use it. (I’ll convert it to a .exe before giving it to them.)
Thanks!
#####
$Form = New-Object System.Windows.Forms.Form
$Form.Size = New-Object System.Drawing.Size(600,400)
function resolvednsInfo {
$wks=$InputBox.text;
$resolvednsResult=resolve-dnsname $wks | fl | out-string;
$outputBox.text=$resolvednsResult
$resolvednsResult | clip
clip >> .\DNS-Records.txt
} #end resolvednsInfo
$InputBox = New-Object System.Windows.Forms.TextBox
$InputBox.Location = New-Object System.Drawing.Size(20,50)
$InputBox.Size = New-Object System.Drawing.Size(150,20)
$Form.Controls.Add($InputBox)
$outputBox = New-Object System.Windows.Forms.TextBox
$outputBox.Location = New-Object System.Drawing.Size(10,150)
$outputBox.Size = New-Object System.Drawing.Size(565,200)
$outputBox.MultiLine = $True
$outputBox.ScrollBars = “Vertical”
$Form.Controls.Add($outputBox)
$Button = New-Object System.Windows.Forms.Button
$Button.Location = New-Object System.Drawing.Size(400,30)
$Button.Size = New-Object System.Drawing.Size(110,40)
$Button.Text = “Resolve DNS”
$Button.Add_Click({resolvednsInfo})
$Form.Controls.Add($Button)
$Form.Add_Shown({$Form.Activate()})
[void] $Form.ShowDialog()
Worked fine with v4. Didn’t work on my Win10 Tech Preview with v5.
Got this error:
Exception calling “GetPowerShell” with “0” argument(s): “Cannot generate a Windows PowerShell object for a ScriptBlock
evaluating non-constant expressions. Non-constant expression: PresentationCore,PresentationFramework,WindowsBase.”
At C:\Users\George\Downloads\ClipboardHistoryViewer.ps1:35 char:1
+ $Runspacehash.PowerShell = {Add-Type -AssemblyName PresentationCore,P …
+ ~~~~~~~~~~~~~~~~~~~~~~~~~~~~~~~~~~~~~~~~~~~~~~~~~~~~~~~~~~~~~~~~~~~~~
+ CategoryInfo : NotSpecified: (:) [], MethodInvocationException
+ FullyQualifiedErrorId : ScriptBlockToPowerShellNotSupportedException
Interesting. I will have to load up Win10 and give that a run. I suspect it is a bug somewhere (not in the script) but need to verify. Thanks for the heads up!
Agreed. It works fine when adding only one assembly, but once you try adding 2 or more, it gives that error. Changing it to the following works though.
$Runspacehash.PowerShell = {Add-Type -AssemblyName PresentationCore; Add-Type -AssemblyName PresentationFramework; Add-Type -AssemblyName WindowsBase}.GetPowerShell()
Thanks for the code. How can I code it to use a fixed width font (Courier New for example) for the content in the ListBox display of the clipboard captures?